|
A virtual printer is a RIP-Queue printer used as a Windows printer. When a RIP-Queue printer is installed, a Windows printer is automatically added to your system. When a job is printed to that Windows printer, the job is sent to RIP-Queue for processing and printing.
You may use any application to print to the Virtual Printer: Graphic design programs, word processors, internet browsers, or other applications.
When a virtual printer is created, it is also shared automatically on the network. This means that any computer on the network, Windows or Macintosh, can print using RIP-Queue through the virtual printer from any application.
 Adding the Virtual Printer a Windows Computer: Adding the Virtual Printer a Windows Computer:
Adding a virtual printer to a Windows computer is done the same way as adding a network printer to the computer
- Go to Control Panel and select Devices and Printers.
- Click [Add a Printer].
- Select Network Printer and click [Next].
- The printer will not normally be detected. Click on the [Printer was not listed] button.
- Specify the host computer name and end with a backslash ( \ ). This will bring up a list of printers, including virtual printers.
- Select the virtual printer and click [Next].
- Click [Finish] when the installation has completed.
Adding the Virtual Printer for a Mac Computer:
Installing a virtual printer on a Mac system is done under the [Printers & Scanners] section in [System Preferences].
- Copy the PPD from the RIP-Queue computer to the Mac hard drive. Location should be safe and easily found.
- In Printers & Scanners, click the plus (+) button to add a new device.
- At the top choose the option [IP].
- Under the [Address] field type in the RIP-Queue computer’s IP address.
- Protocol must be set to Line Printer Daemon – LPD.
- Under the [Queue] section, type in the printer share name defined on the RIP-Queue computer. Remember this share name must be typed in exactly as it shows on the RIP-Queue computer.
- Name is what will show in the print windows on the Mac. Give it a name that makes it easy to identify what printer it is. This does not need to match the printer’s share name.
- Location is also an option that can be set to anything desired.
- For the [Use] option, choose [Other]. A file browsing window opens. Go to the folder where the PPD was placed in Step 1. Select it and click [Open].
- Lastly click [Add] to complete the virtual printer installation
Using the Virtual Printer
Using a virtual printer can require a few extra steps to make sure size, orientation and correct Quick Set are used. The option locations will vary based on what application is printing the jobs to the RIP-Queue computer. Because of this general options that need to be set will be listed below.
- Page size printed needs to be configured to match the artboard size. In some applications this can be done in the main print window by selecting, Custom and specifying the image dimensions. If that is not an option choose [Custom PostScript Page Size]. After selecting this option, [Custom PostScript Page Size] needs to be defined. It is found in the [Advanced] section of the printing window.
- In Custom PostScript Page Size, there is an option to determine orientation, [Long Edge First] and [Short Edge First]. This means the file will be oriented either the long edge or the short edge is the width and the other edge will be the height. Another way to see it is, Long Edge First is the same as landscape and Short Edge First is the same as portrait.
- The last item to address is the Quick Set. The Quick Set needs to be set otherwise the Default Quick Set is used. The Quick Set options are set in the Advanced section of the print window. The specific location will vary based on OS and application.
After configuring the settings, click [Print] and the job will be sent to RIP-Queue as a PostScript file.
NOTE: Virtual Printer only works in the RIP products. For more information, see a white paper.
|
|
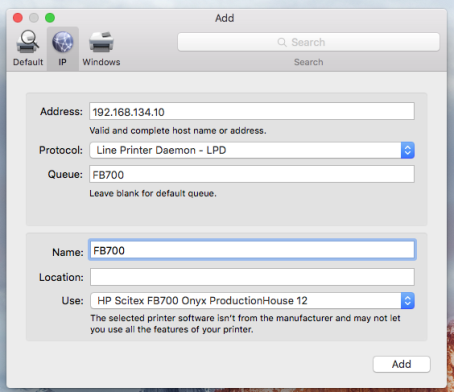
Adding the Virtual printer on a Mac
|